How to Make a Modern Doormat Out Of Wood For Your Home
Hi, guys! I hope, everyone will agree with me that using things we have done ourselves brings much more joy and pleasure as compared to using the same items we have bought in a shop. This concerns everything, starting from everyday utensils and up to jewelry and accessories. So, if you have made up your mind to get a new doormat, don’t hurry to shop for it. This tutorial will help you create a cute and simple doormat out of wood that will not only have a modern look, but will fit any interior or exterior. So, let’s get started!
Step 1: Supplies
To make a new wooden doormat for your home, you will not need any extra tools and accessories. Everything you will have to use is always at hand in any home:
- Two pieces of lumber that are 1.8 meters long and 2.5 cm x 2 cm thick or 6 boards that are 61 cm long and 2.5 cm x 2 cm thick
- Ten round beads made of wood, the diameter of which should not exceed 2.5 cm
- Pencil
- Tape measure
- Straight edge
- A drill bit and a drill
- A piece of a cord or rope, which is 0.5 cm thick and 165 cm long
- Sanding paper
- Paint or stain (if you wish)
- Scissors
- Any type of saw you have at home, be it a handsaw, a miter saw or a band saw
Step 2: Measure and Mark the Pieces of Lumber
If you have two large pieces of lumber, the dimensions of which are specified in the “supplies” section, then you will have to measure and mark them into 6 sections, each of which should be 61 cm long. If you manage to find 6 equal pieces of lumber of the required size, then proceed directly to Step 3, because you already have the required materials.
Step 3: Cut Large Lumber Pieces Into Equal Parts
Having marked the lumber pieces, take the saw and cut them into equal parts using the marks you have made with a pencil. Now, you have the material to work with.
Step 4: Mark the Spots For Drilling
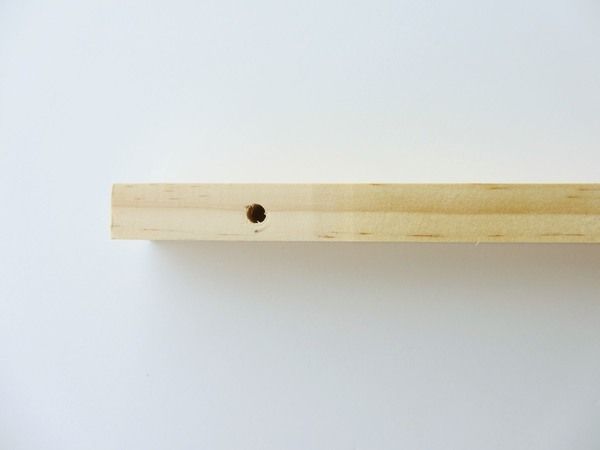
Leave the boards you have made aside for a while. Take one of them and mark a spot, which is 5 cm away from the end of the board (just like you see on the picture). Having marked one side of the board, repeat the step on the opposite side. You have to mark all the boards you have prepared. By the way, make sure you place marks on the smaller dimension of the board.
Step 5: Drill Holes
Take a drill and a drill bit, which has the same diameter as the rope you plan to use. Drill holes on both sides of a board. All in all, you will have to drill 12 holes – two in each board you have. These holes are required to attach the rope, which will hold all the boards of the mat together.
Step 6: Sand the Edges
As far as the edges of the boards may be rough after you cut them, it makes sense to take the sanding paper and fix the problem. If you are going to use any paint or stain, do that right after you complete this step. Additional painting or staining is not obligatory, but it will make your doormat look brighter and more appealing. You can also choose the color that fits into the color scheme of your interior.
Step 7: Start Assembling the Doormat
Before you start assembling your doormat, tie a tight knot at the end of one board. The knot should be quite large to prevent the rope from sliding through the hole you have drilled. Repeat the same action on the opposite side of the board.
Step 8: Attach the Bead
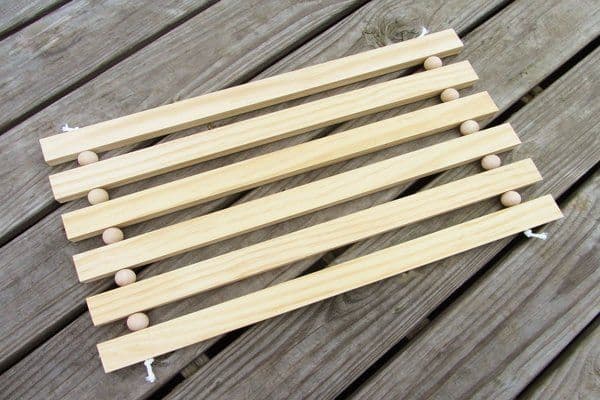
Having tightened the knot, take a bead and attach it to the board just like you see on the picture. The same action should be done on the opposite end of the board.
Step 9: Continue Threading Beads and Boards
Now that you understand how to thread beads and boards, take your time to repeat the step until you use all the materials you have prepared (I mean all 10 beads and 6 boards). Then tie another knot as we did in Step 6 to fix the whole construction together. If there is any extra piece of a rope, take the scissors and trim it.
Step 10: Enjoy the Result!
That’s it! Your brand new wooden doormat is ready! It looks stylish and cute, doesn’t it? I decided to leave my doormat natural, so I didn’t paint it. Your mat may have another look depending upon your preferences and interior needs. The whole process did not take me more than 40 minutes or so, but the result is great! Good luck!


 English